Go to the Item Property
Advanced > Custom Attributes
Type the below Code:
/
onKeyUp="this.value = this.value.toUpperCase()" ---database insert apex view & upper
///
style="text-transform:uppercase"
/
style="text-transform:uppercase"
for Lower Case:
style="text-transform:lowercase"
/
style="text-transform:lowercase"
when you save and run the page, you will see what ever the user types, inline it will be auto converted to upper case.
Tuesday, November 27, 2018
Sunday, September 30, 2018
Date time function f_delivery_time
create or replace function f_delivery_time(p_delivery_time varchar2, p_booking_time varchar2) return Char is
v number(10,4);
begin
v:=24*(to_date(p_delivery_time , 'DD-MON-RR HH24:MI:SS') - to_date(p_booking_time, 'DD-MON-RR HH24:MI:SS'));
return(v);
end;
/
select f_delivery_time('20-SEP-18 15:10:10','20-SEP-18 14:10:10') from dual;
1
EXEC DBMS_OUTPUT.PUT_LINE(f_delivery_time('20-SEP-18 15:10:10','20-SEP-18 14:10:10'));
1
/*
select end_date,start_date,
trunc(months_between(end_date,start_date)/12) as yrs ,
trunc(mod( months_between(end_date,start_date) ,12)) as mnts,
trunc(end_date - add_months( start_date, months_between(end_date,start_date))) as dys,
trunc(24*mod(end_date - start_date,1)) as hrs,
trunc( mod(mod(end_date - start_date,1)*24,1)*60 ) as mins ,
mod(mod(mod(end_date - start_date,1)*24,1)*60,1)*60 as secs
from ( select to_date('15/11/2015 11:19:58','dd/mm/yyyy hh24:mi:ss') end_date ,
to_date('14/10/2014 10:18:57','dd/mm/yyyy hh24:mi:ss') start_date
from dual );
*/
v number(10,4);
begin
v:=24*(to_date(p_delivery_time , 'DD-MON-RR HH24:MI:SS') - to_date(p_booking_time, 'DD-MON-RR HH24:MI:SS'));
return(v);
end;
/
select f_delivery_time('20-SEP-18 15:10:10','20-SEP-18 14:10:10') from dual;
1
EXEC DBMS_OUTPUT.PUT_LINE(f_delivery_time('20-SEP-18 15:10:10','20-SEP-18 14:10:10'));
1
/*
select end_date,start_date,
trunc(months_between(end_date,start_date)/12) as yrs ,
trunc(mod( months_between(end_date,start_date) ,12)) as mnts,
trunc(end_date - add_months( start_date, months_between(end_date,start_date))) as dys,
trunc(24*mod(end_date - start_date,1)) as hrs,
trunc( mod(mod(end_date - start_date,1)*24,1)*60 ) as mins ,
mod(mod(mod(end_date - start_date,1)*24,1)*60,1)*60 as secs
from ( select to_date('15/11/2015 11:19:58','dd/mm/yyyy hh24:mi:ss') end_date ,
to_date('14/10/2014 10:18:57','dd/mm/yyyy hh24:mi:ss') start_date
from dual );
Thursday, August 30, 2018
Sunday, August 26, 2018
set oracle word one, two,...way
SQL> declare
2 v varchar2(20):='ORACLE';
3 i number(10):=1;
4 begin
5 for j in 1..length(v)
6 loop
7 dbms_output.put_line(substr(v,i,j));
8 end loop;
9 end;
10 /
O
OR
ORA
ORAC
ORACL
ORACLE
PL/SQL procedure successfully completed.
SQL> Select substr('ORACLE',1, level)
2 from dual connect by level <=6;
SUBSTR('ORACLE',1,LEVEL)
------------------------
O
OR
ORA
ORAC
ORACL
ORACLE
6 rows selected.
Sunday, August 12, 2018
upload, edit and download files using forms & webutil to oracle database
Oracle Forms Web
Upload, edit and download files from/to the database with the
Webutil library
1. Purpose
The purpose of this article is to demonstrate how, with the Webutil library, we can upload local documents into the database, edit those stored documents on the client machine, save modified documents to the database, and use the MSWord CheckSpell function.
The goal is to have, with Webutil, the same functionality as an “OLE CONTAINER” C/S component.
2. Upload local document to the database
Select a file on the client machine with the WEBUTIL_FILE.FILE_OPEN_DIALOG function FUNCTION WEBUTIL_FILE.FILE_OPEN_DIALOG (
directory_name,
file_name,
file_filter,
title
) return VARCHAR2;
directory_name is the name of the starting directory (let empty to start at the root)
file_name is the name of the searching file
file_filter is the list of file types to display (e.g. '|All files|*.*|' or '|Word Files|*.doc|Excel Files|*.xls|')
title is the title of the dialog box
Upload the selected document into the database with the Webutil_File_Transfer.Client_To_DB function
FUNCTION Webutil_File_Transfer.Client_To_DB
(
clientFile in VARCHAR2,
tableName in VARCHAR2,
columnName in VARCHAR2,
whereClause in VARCHAR2,
asynchronous in BOOLEAN default FALSE,
callbackTrigger in VARCHAR2 default NULL
) return BOOLEAN;
clientFile is the full file name returned by the File_Open_Dialog() function
tableName is the table that contains a BLOB column
columnName is the BLOB column you want to store the file
whereClause is the Where clause to identify a unique raw in the table
asynchronous allows form to re-draw its screen before the end of the upload
callbackTrigger is the name of a form-level trigger which will be called once the upload is completed.
Assume you want to store the c:\docs\doc.xls in the DOC column of the DOCUMENTS table where DOC_ID = 10, use the following instruction:
Declare
LB$Result BOOLEAN ;
Begin
LB$Result := Webutil_File_Transfer.Client_To_DB
(
‘c:\docs\doc.xls’,
‘DOCUMENTS’,
‘DOC’,
‘DOC_ID = 10’
) ;
End ;
Attention:
The Client_To_DB() function use an UPDATE statement to store the document in an existing BLOB column, so the corresponding raw must exists in the table before calling the function.
3. Download from database, edit on client machine and re-save document to database
Download the document on the client machine with the Webutil_File_Transfer.DB_To_Client function
FUNCTION DB_To_Client
(
clientFile in VARCHAR2,
tableName in VARCHAR2,
columnName in VARCHAR2,
whereClause in VARCHAR2
) return BOOLEAN;
clientFile is the local file name
tableName is the table that contains a BLOB column
columnName is the BLOB column you want to store the file
whereClause is the Where clause to identify a unique raw in the table
Edit the document with the Webutil_Host.blocking function
FUNCTION Blocking(cmd in VARCHAR2) return PROCESS_ID;
Example:
Declare
LC$Cmd Varchar2(256) ;
Ret WEBUTIL_HOST.PROCESS_ID ;
LN$Result Pls_Integer ;
LC$FicName Varchar2(128) := Name_In( ‘BLOB_TABLE.DOC_NAME’ ) ;
Begin
LC$Cmd := 'cmd /c start "" /WAIT "' || LC$FicName || '"' ;
Ret := WEBUTIL_HOST.blocking( LC$Cmd ) ;
LN$Result := WEBUTIL_HOST.Get_return_Code( Ret ) ;
End ;
Note the /WAIT parameter that wait the return of calling function before returning to Forms
Re-save the modified document into the database with the Webutil_File_Transfer.Client_To_DB function
Delete the temporary local file with the Webutil_File.Delete_File function
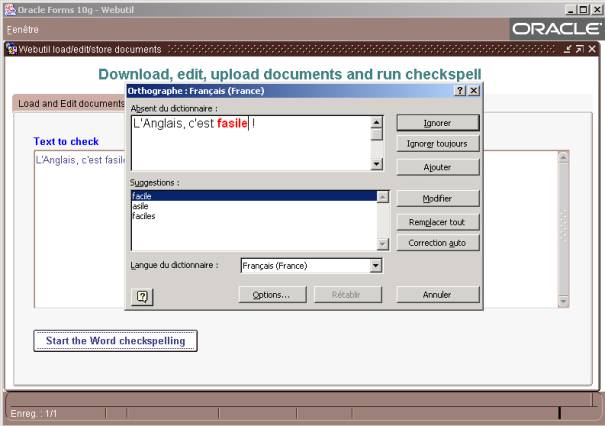
4. Call the CheckSpell MSWord function with CLIENT_OLE2
The following code allows to call the MSWord CheckSpell function and pass as an argument the content of a TEXT item
PROCEDURE CheckSpell
(
PC$Item in Varchar2
) IS
-------------------------------------------
-- Call the MSWord CheckSpell function --
-------------------------------------------
MyApplication client_ole2.OBJ_TYPE;
MyDocuments client_ole2.OBJ_TYPE;
MyDocument client_ole2.OBJ_TYPE;
MySelection client_ole2.OBJ_TYPE;
args client_ole2.LIST_TYPE;
Begin
MyApplication:=client_ole2.CREATE_OBJ('Word.Application');
client_ole2.SET_PROPERTY(MyApplication, 'Visible', 0);
MyDocuments:=client_ole2.GET_OBJ_PROPERTY(MyApplication, 'Documents');
MyDocument := CLIENT_OLE2.INVOKE_OBJ(MyDocuments,'add');
Myselection := CLIENT_OLE2.GET_OBJ_PROPERTY(Myapplication,'Selection');
client_ole2.SET_PROPERTY(Myselection,'Text',Name_in(PC$item));
client_ole2.INVOKE(MyDocument,'CheckSpelling');
MySelection:=client_ole2.GET_OBJ_PROPERTY(MyApplication, 'Selection');
client_ole2.INVOKE(mYSelection,'WholeStory');
client_ole2.INVOKE(MYSelection,'Copy');
COPY( CLIENT_OLE2.GET_CHAR_PROPERTY(Myapplication,'Selection'), PC$Item ) ;
args := CLIENT_OLE2.CREATE_ARGLIST;
client_ole2.ADD_ARG(args,0);
client_ole2.INVOKE(MyDocument,'Close',args);
client_ole2.DESTROY_ARGLIST(args);
client_ole2.INVOKE(MyApplication,'Quit');
client_ole2.RELEASE_OBJ(MySelection);
client_ole2.RELEASE_OBJ(MyDocument);
client_ole2.RELEASE_OBJ(MyDocuments);
client_ole2.RELEASE_OBJ(MyApplication);
copy(Substr(Replace(Name_in(PC$Item),CHR(13),CHR(10)),1,Length(Name_in(PC$Item))-1), PC$item );
Exception
When others then
Null ;
End;
You can call this procedure with the following code:
CheckSpell( :system.cursor_item ) ;
5. Sample dialog
The WEBUTIL_DOCS.fmb Forms module allow to test all these manipulations.
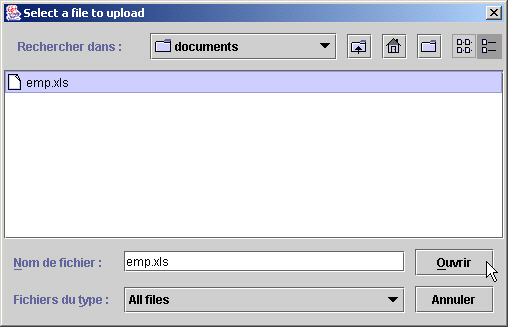
Click the Select a local file… button to choose a file on your local machine
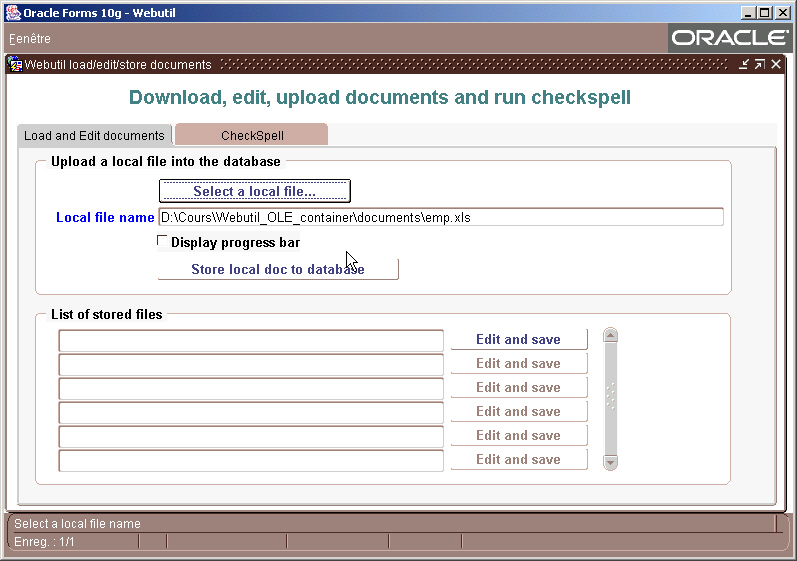
Click the Store local doc to database button to store the selected file in the database
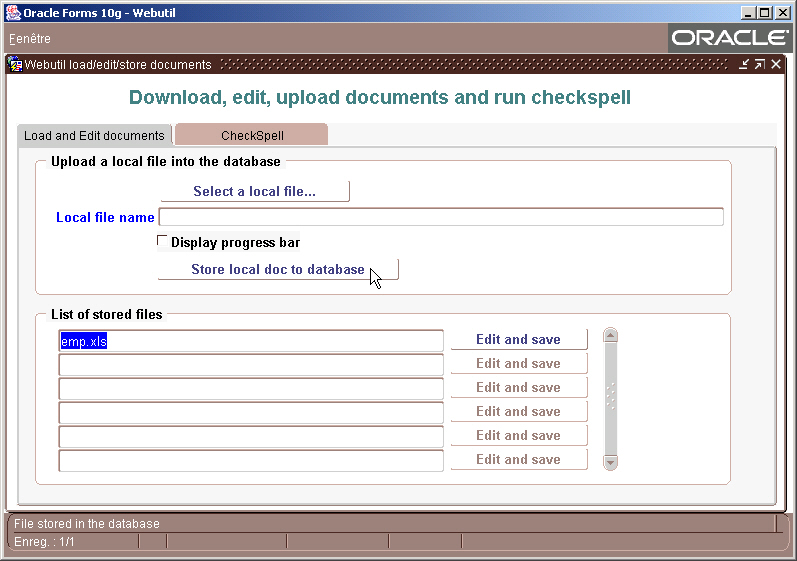
The name of the new stored file is now displayed in the list of stored files
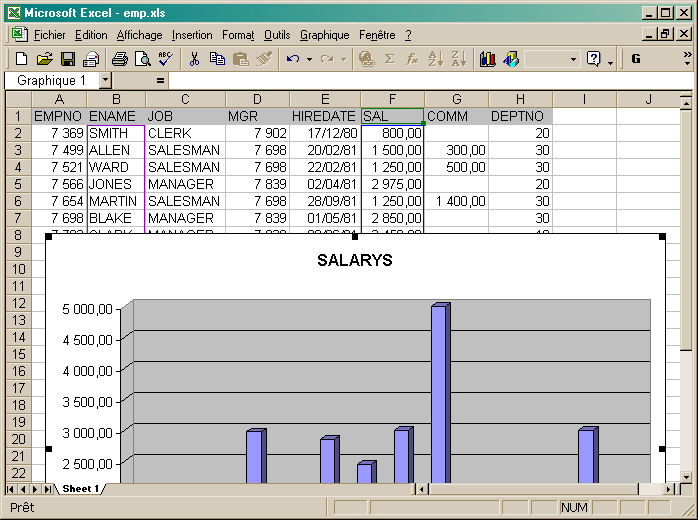
Double-click on the file name or click the Edit and save button to edit the document.
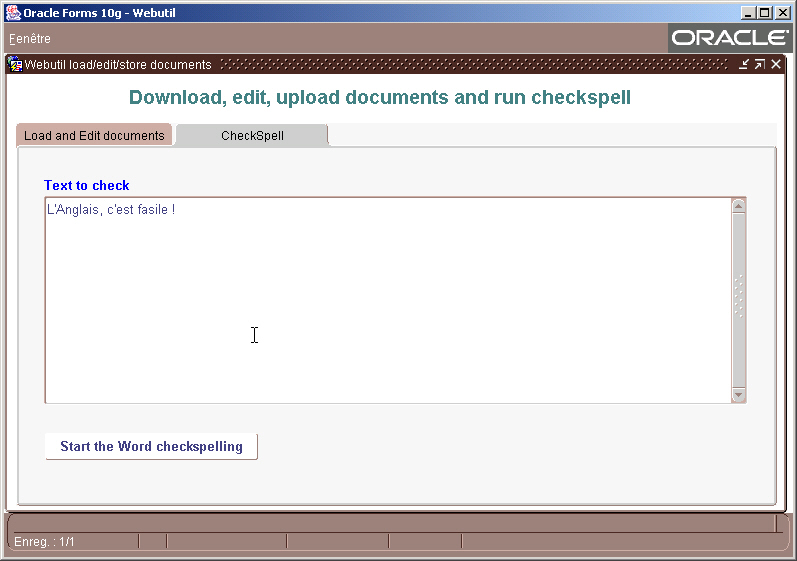
Run the CheckSpell function...
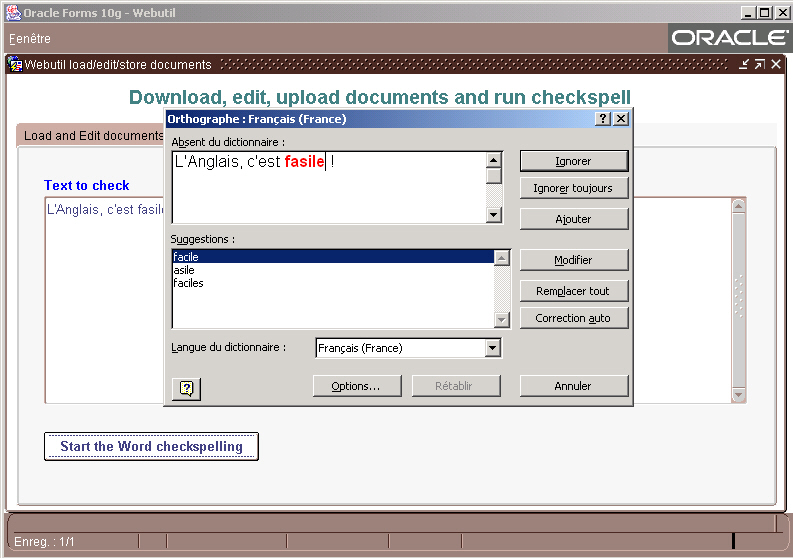
Click the Start the Word checkspelling button ...
This dialog is based on the BIN_DOCS table. You can use the following creation script.
CREATE TABLE BIN_DOCS
(
DOC_ID NUMBER(5) PRIMARY KEY,
NAME VARCHAR2(128 BYTE),
DOC BLOB
)
/
This basic sample could be the starting point of a most elaborated documentation application.
You could add some columns to the BIN_DOCS table to implement a check-in/check-out functionality that
allows every user to see a doc but only one could modify at the same time.
credited google
Download the document on the client machine with the Webutil_File_Transfer.DB_To_Client function
FUNCTION DB_To_Client
(
clientFile in VARCHAR2,
tableName in VARCHAR2,
columnName in VARCHAR2,
whereClause in VARCHAR2
) return BOOLEAN;
clientFile is the local file name
tableName is the table that contains a BLOB column
columnName is the BLOB column you want to store the file
whereClause is the Where clause to identify a unique raw in the table
Edit the document with the Webutil_Host.blocking function
FUNCTION Blocking(cmd in VARCHAR2) return PROCESS_ID;
Example:
Declare
LC$Cmd Varchar2(256) ;
Ret WEBUTIL_HOST.PROCESS_ID ;
LN$Result Pls_Integer ;
LC$FicName Varchar2(128) := Name_In( ‘BLOB_TABLE.DOC_NAME’ ) ;
Begin
LC$Cmd := 'cmd /c start "" /WAIT "' || LC$FicName || '"' ;
Ret := WEBUTIL_HOST.blocking( LC$Cmd ) ;
LN$Result := WEBUTIL_HOST.Get_return_Code( Ret ) ;
End ;
Note the /WAIT parameter that wait the return of calling function before returning to Forms
Re-save the modified document into the database with the Webutil_File_Transfer.Client_To_DB function
Delete the temporary local file with the Webutil_File.Delete_File function
4. Call the CheckSpell MSWord function with CLIENT_OLE2
The following code allows to call the MSWord CheckSpell function and pass as an argument the content of a TEXT item
PROCEDURE CheckSpell
(
PC$Item in Varchar2
) IS
-------------------------------------------
-- Call the MSWord CheckSpell function --
-------------------------------------------
MyApplication client_ole2.OBJ_TYPE;
MyDocuments client_ole2.OBJ_TYPE;
MyDocument client_ole2.OBJ_TYPE;
MySelection client_ole2.OBJ_TYPE;
args client_ole2.LIST_TYPE;
Begin
MyApplication:=client_ole2.CREATE_OBJ('Word.Application');
client_ole2.SET_PROPERTY(MyApplication, 'Visible', 0);
MyDocuments:=client_ole2.GET_OBJ_PROPERTY(MyApplication, 'Documents');
MyDocument := CLIENT_OLE2.INVOKE_OBJ(MyDocuments,'add');
Myselection := CLIENT_OLE2.GET_OBJ_PROPERTY(Myapplication,'Selection');
client_ole2.SET_PROPERTY(Myselection,'Text',Name_in(PC$item));
client_ole2.INVOKE(MyDocument,'CheckSpelling');
MySelection:=client_ole2.GET_OBJ_PROPERTY(MyApplication, 'Selection');
client_ole2.INVOKE(mYSelection,'WholeStory');
client_ole2.INVOKE(MYSelection,'Copy');
COPY( CLIENT_OLE2.GET_CHAR_PROPERTY(Myapplication,'Selection'), PC$Item ) ;
args := CLIENT_OLE2.CREATE_ARGLIST;
client_ole2.ADD_ARG(args,0);
client_ole2.INVOKE(MyDocument,'Close',args);
client_ole2.DESTROY_ARGLIST(args);
client_ole2.INVOKE(MyApplication,'Quit');
client_ole2.RELEASE_OBJ(MySelection);
client_ole2.RELEASE_OBJ(MyDocument);
client_ole2.RELEASE_OBJ(MyDocuments);
client_ole2.RELEASE_OBJ(MyApplication);
copy(Substr(Replace(Name_in(PC$Item),CHR(13),CHR(10)),1,Length(Name_in(PC$Item))-1), PC$item );
Exception
When others then
Null ;
End;
You can call this procedure with the following code:
CheckSpell( :system.cursor_item ) ;
5. Sample dialog
The WEBUTIL_DOCS.fmb Forms module allow to test all these manipulations.
Click the Select a local file… button to choose a file on your local machine
Click the Store local doc to database button to store the selected file in the database
The name of the new stored file is now displayed in the list of stored files
Double-click on the file name or click the Edit and save button to edit the document.
Run the CheckSpell function...
Click the Start the Word checkspelling button ...
This dialog is based on the BIN_DOCS table. You can use the following creation script.
CREATE TABLE BIN_DOCS
(
DOC_ID NUMBER(5) PRIMARY KEY,
NAME VARCHAR2(128 BYTE),
DOC BLOB
)
/
This basic sample could be the starting point of a most elaborated documentation application.
You could add some columns to the BIN_DOCS table to implement a check-in/check-out functionality that
allows every user to see a doc but only one could modify at the same time.
credited google
Monday, June 4, 2018
how many rows update using loop in oracle using pl/sql procedure
set serveroutput on
declare
cursor c1 is
select a,B from ab;
counter integer := 0;
begin
for cr in c1 loop
update item
set BASIC_PRICE=cr.b
where itemcode=cr.a;
counter := counter + sql%rowcount;
end loop;
dbms_output.put_line('Number of total lines affected update operation: '||counter);
end;
/
Number of total lines affected update operation: 128
PL/SQL procedure successfully completed.
How to split a phone no to country code,std code,Land Line more
with ph as
(select '091-044-234678' phone from dual),
ph1 as
(select phone,substr(phone,instr(phone,'-',1)+1) as phone2 from ph),
ph2 as
(select phone,phone2,substr(phone2,instr(phone2,'-',1)+1) as phone3 from ph1)
select * from ph2
select substr(phone,0,instr(phone,'-',1)-1) phone,
substr(phone2,0,instr(phone2,'-',1)-1)phone2,phone3
from ph2
ph1 as
(select phone,substr(phone,instr(phone,'-',1)+1) as phone2 from ph),
ph2 as
(select phone,phone2,substr(phone2,instr(phone2,'-',1)+1) as phone3 from ph1)
select * from ph2
select substr(phone,0,instr(phone,'-',1)-1) phone,
substr(phone2,0,instr(phone2,'-',1)-1)phone2,phone3
from ph2
-------------
Find List of Referenced dependencies for a package or procedure or view
select referenced_owner,referenced_name from all_dependencies where lower(name)='package Name'
Get Financial Year Week no for given date
Financial Week start from 01-Apr each year. So for 01-Apr of that year i should get week number as 1.
select
to_char(SYSDATE) the_date,
to_char(add_months(SYSDATE,-3),'WW') fiscal_week
from dual
select
to_char(SYSDATE) the_date,
to_char(add_months(SYSDATE,-3),'WW') fiscal_week
from dual
Connect By Root Example
I have a Table person_map which will have 2 columns,
Person_id,Mapped_person_id
For Example
Person_ID Mapped_Person_id
1 2
2 3
3 4
5 6
6 7
I require a query which will give output like below
1 2
1 3
1 4
2 3
2 4
3 4
5 6
5 7
6 7
Scripts
Create table Person (person_id Number, Mapped_person_id Number);
INSERT INTO PERSON VALUES ( 1,2);
INSERT INTO PERSON VALUES ( 2,3);
INSERT INTO PERSON VALUES ( 3,4);
INSERT INTO PERSON VALUES ( 5,6);
INSERT INTO PERSON VALUES ( 6,7);
Solution:
SELECT level, person_id AS original_person_id, CONNECT_BY_ROOT person_id AS root_person_id, mapped_person_id
FROM person
CONNECT BY person_id = prior mapped_person_id;
How to find Table Last Altered Date/Time in Oracle


select * from dba_objects
where owner='

'
and object_name ='


'
Monday, May 14, 2018
Exception fine Oracle forms all
Exception fine
BEGIN
PL/SQL BLOCK;
EXCEPTION
WHEN OTHERS THEN
MESSAGE('SQLERRM: ' || SQLERRM);
END;
BEGIN
PL/SQL BLOCK;
EXCEPTION
WHEN OTHERS THEN
MESSAGE('SQLERRM: ' || SQLERRM);
END;
Thursday, May 3, 2018
Do you want to draw the Christmas tree???
SQL> set heading off
SQL> set feedback off
SQL> set pagesize 2000
SQL>
SQL> select decode
2 ( sign(floor(maxwidth/2)-rownum)
3 , 1, lpad( ' ', floor(maxwidth/2)-(rownum-1))
4 || rpad( '*', 2*(rownum-1)+1, ' *')
5 , lpad( '* * *', floor(maxwidth/2)+3))
6 from all_objects
7 , (select 40 as maxwidth from dual)
8 where rownum < floor(maxwidth/2) +5;
*
* *
* * *
* * * *
* * * * *
* * * * * *
* * * * * * *
* * * * * * * *
* * * * * * * * *
* * * * * * * * * *
* * * * * * * * * * *
* * * * * * * * * * * *
* * * * * * * * * * * * *
* * * * * * * * * * * * * *
* * * * * * * * * * * * * * *
* * * * * * * * * * * * * * * *
* * * * * * * * * * * * * * * * *
* * * * * * * * * * * * * * * * * *
* * * * * * * * * * * * * * * * * * *
* * *
* * *
* * *
* * *
* * *
*
* * *
* * * * *
SQL> set feedback off
SQL> set pagesize 2000
SQL>
SQL> select decode
2 ( sign(floor(maxwidth/2)-rownum)
3 , 1, lpad( ' ', floor(maxwidth/2)-(rownum-1))
4 || rpad( '*', 2*(rownum-1)+1, ' *')
5 , lpad( '* * *', floor(maxwidth/2)+3))
6 from all_objects
7 , (select 40 as maxwidth from dual)
8 where rownum < floor(maxwidth/2) +5;
*
* *
* * *
* * * *
* * * * *
* * * * * *
* * * * * * *
* * * * * * * *
* * * * * * * * *
* * * * * * * * * *
* * * * * * * * * * *
* * * * * * * * * * * *
* * * * * * * * * * * * *
* * * * * * * * * * * * * *
* * * * * * * * * * * * * * *
* * * * * * * * * * * * * * * *
* * * * * * * * * * * * * * * * *
* * * * * * * * * * * * * * * * * *
* * * * * * * * * * * * * * * * * * *
* * *
* * *
* * *
* * *
* * *
To Srinivas
SQL> select ' *'||chr(10)||' * * *'||chr(10)||'* * * * *' from dual;*
* * *
* * * * *
Wednesday, May 2, 2018
Delete Duplicate Rows From Table in Oracle SQL
Solution:
delete from table_name
where rowid not in
(select max(rowid) from table_name group by primary_key);
delete from emp_attn_Data
where rowid not in
(select max(rowid) from emp_attn_Data group by emp_id||at_dt);
select * from emp_attn_Data
where rowid not in
(select max(rowid) from emp_attn_Data group by emp_id||at_dt);
select * from emp_attn_Data
where rowid not in
(select max(rowid) from emp_attn_Data group by emp_id||at_dt) and at_dt between '26-MAY-18' and '25-JUN-18'
order by emp_id
কি-বোর্ডের ৯৭টি শর্টকাট টিপস৷
1. CTRL + C (কপি করুন)
2. Ctrl + X (কাট)
3. Ctrl + V (পেস্ট)
4. এবার CTRL + Z এর (পূর্বাবস্থায় ফিরুন)
3. Ctrl + V (পেস্ট)
4. এবার CTRL + Z এর (পূর্বাবস্থায় ফিরুন)
5. DELETE (Delete)
6. Shift + DELETE (রিসাইকেল বিনে আইটেমটি স্থাপন ছাড়া স্থায়ীভাবে নির্বাচিত আইটেম মুছুন)
7. এবার CTRL যখন একটি আইটেম (নির্বাচিত আইটেম কপি) টেনে
8. Ctrl + Shift যখন একটি আইটেম টেনে (নির্বাচিত আইটেমের একটি শর্টকাট তৈরি করুন)
6. Shift + DELETE (রিসাইকেল বিনে আইটেমটি স্থাপন ছাড়া স্থায়ীভাবে নির্বাচিত আইটেম মুছুন)
7. এবার CTRL যখন একটি আইটেম (নির্বাচিত আইটেম কপি) টেনে
8. Ctrl + Shift যখন একটি আইটেম টেনে (নির্বাচিত আইটেমের একটি শর্টকাট তৈরি করুন)
9. F2 চেপে কী (নির্বাচিত আইটেমের রিনেম)
10. এবার CTRL + Right Arrow (পরবর্তী শব্দের শুরুতে সন্নিবেশ বিন্দু সরান)
11. এবার CTRL + Left Arrow (পূর্ববর্তী শব্দের শুরুতে সন্নিবেশ বিন্দু সরান)
12. এবার CTRL + Down Arrow (পরবর্তী অনুচ্ছেদের শুরুতে সন্নিবেশ বিন্দু সরান)
10. এবার CTRL + Right Arrow (পরবর্তী শব্দের শুরুতে সন্নিবেশ বিন্দু সরান)
11. এবার CTRL + Left Arrow (পূর্ববর্তী শব্দের শুরুতে সন্নিবেশ বিন্দু সরান)
12. এবার CTRL + Down Arrow (পরবর্তী অনুচ্ছেদের শুরুতে সন্নিবেশ বিন্দু সরান)
13. এবার CTRL + Up Arrow (পূর্ববর্তী অনুচ্ছেদের শুরুতে সন্নিবেশ বিন্দু সরান)
14. তীরচিহ্নগুলি সাথে Ctrl + Shift (টেক্সট একটি ব্লক শব্দ হাইলাইট হবে)
তীরচিহ্নের সাহায্যে কোনো সঙ্গে শাখা (একটি উইন্ডোতে বা ডেস্কটপে একাধিক আইটেম নির্বাচন করুন, অথবা একটি নথিতে টেক্সট নির্বাচন করুন)
14. তীরচিহ্নগুলি সাথে Ctrl + Shift (টেক্সট একটি ব্লক শব্দ হাইলাইট হবে)
তীরচিহ্নের সাহায্যে কোনো সঙ্গে শাখা (একটি উইন্ডোতে বা ডেস্কটপে একাধিক আইটেম নির্বাচন করুন, অথবা একটি নথিতে টেক্সট নির্বাচন করুন)
15. Ctrl + A (সকল নির্বাচন করুন)
16 থেকে F3 কী (একটি ফাইল অথবা ফোল্ডার জন্য অনুসন্ধান করুন)
17. ALT + ENTER (নির্বাচিত আইটেমের জন্য বৈশিষ্ট্য দেখুন)
18. Alt + F4 (সক্রিয় আইটেমটি বন্ধ, অথবা সক্রিয় প্রোগ্রাম প্রস্থান)
16 থেকে F3 কী (একটি ফাইল অথবা ফোল্ডার জন্য অনুসন্ধান করুন)
17. ALT + ENTER (নির্বাচিত আইটেমের জন্য বৈশিষ্ট্য দেখুন)
18. Alt + F4 (সক্রিয় আইটেমটি বন্ধ, অথবা সক্রিয় প্রোগ্রাম প্রস্থান)
19. ALT + ENTER (নির্বাচিত বস্তুর বৈশিষ্ট্যাবলী প্রর্দশিত)
20. এবং ALT + Spacebar (সক্রিয় উইন্ডোর শর্টকাট মেনু খুলুন)
21. Ctrl + F4 (সক্রিয় ডকুমেন্ট বন্ধ প্রোগ্রাম যে আপনি একাধিক নথি আছে সক্রিয় মধ্যে opensimultaneou সেয়ানা)
22. ALT + TAB এর (খোলা আইটেম মধ্যে স্যুইচ করুন)
20. এবং ALT + Spacebar (সক্রিয় উইন্ডোর শর্টকাট মেনু খুলুন)
21. Ctrl + F4 (সক্রিয় ডকুমেন্ট বন্ধ প্রোগ্রাম যে আপনি একাধিক নথি আছে সক্রিয় মধ্যে opensimultaneou সেয়ানা)
22. ALT + TAB এর (খোলা আইটেম মধ্যে স্যুইচ করুন)
23. Alt + Esc (যাতে তারা খোলা হয়েছে এ আইটেম মাধ্যমে সাইকেল)
24. F6 চেপে কী (একটি উইন্ডোতে বা ডেস্কটপে পর্দা উপাদানের মাধ্যমে সাইকেল)
25. F4 কী (আমার কম্পিউটার বা উইন্ডোজ এক্সপ্লোরার এড্রেসবারে তালিকা প্রদর্শন)
26. Shift + F10 (নির্বাচিত আইটেমের জন্য শর্টকাট মেনু প্রদর্শন)
24. F6 চেপে কী (একটি উইন্ডোতে বা ডেস্কটপে পর্দা উপাদানের মাধ্যমে সাইকেল)
25. F4 কী (আমার কম্পিউটার বা উইন্ডোজ এক্সপ্লোরার এড্রেসবারে তালিকা প্রদর্শন)
26. Shift + F10 (নির্বাচিত আইটেমের জন্য শর্টকাট মেনু প্রদর্শন)
27. এবং ALT + Spacebar (সক্রিয় উইন্ডোর জন্য সিস্টেম মেনু প্রদর্শন)
28. Ctrl + Esc (স্টার্ট মেনু প্রদর্শন)
29. ALT + নিম্নরেখাঙ্কিত চিঠি (সংশ্লিষ্ট মেনু প্রদর্শন) একটি খোলা মেনুতে একটি কমান্ডের নাম আন্ডারলাইন চিঠি (অনুরূপ কমান্ড চালনার)
30. এবার F10 বাটন (সক্রিয় প্রোগ্রামের মেনু বার সক্রিয়)
28. Ctrl + Esc (স্টার্ট মেনু প্রদর্শন)
29. ALT + নিম্নরেখাঙ্কিত চিঠি (সংশ্লিষ্ট মেনু প্রদর্শন) একটি খোলা মেনুতে একটি কমান্ডের নাম আন্ডারলাইন চিঠি (অনুরূপ কমান্ড চালনার)
30. এবার F10 বাটন (সক্রিয় প্রোগ্রামের মেনু বার সক্রিয়)
31. ডান তীর (ডান পাশে মেনু খুলুন, বা একটি সাবমেনু ওপেন)
32. Left Arrow (বাম পাশে মেনু খুলুন, বা একটি সাবমেনু বন্ধ)
33. F5 চাপুন কী (সক্রিয় উইন্ডোর আপডেট)
34. BACKSPACE (আমার কম্পিউটার বা উইন্ডোজ এক্সপ্লোরার ফোল্ডার onelevel আপ দেখুন)
32. Left Arrow (বাম পাশে মেনু খুলুন, বা একটি সাবমেনু বন্ধ)
33. F5 চাপুন কী (সক্রিয় উইন্ডোর আপডেট)
34. BACKSPACE (আমার কম্পিউটার বা উইন্ডোজ এক্সপ্লোরার ফোল্ডার onelevel আপ দেখুন)
35. চট্টগ্রাম সিটি কর্পোরেশন (বাতিল বর্তমান টাস্ক)
36. নামান যখন আপনি একটি সিডি-ROMinto CD-ROM ড্রাইভ ঢোকান (playing স্বয়ংক্রীয়ভাবে থেকে CD-ROM- র আটকান)
37. Ctrl + Tab (ট্যাব মাধ্যমে অগ্রসর)
38. এবার CTRL + Shift + Tab (ট্যাব মাধ্যমে পশ্চাদবর্তী)
36. নামান যখন আপনি একটি সিডি-ROMinto CD-ROM ড্রাইভ ঢোকান (playing স্বয়ংক্রীয়ভাবে থেকে CD-ROM- র আটকান)
37. Ctrl + Tab (ট্যাব মাধ্যমে অগ্রসর)
38. এবার CTRL + Shift + Tab (ট্যাব মাধ্যমে পশ্চাদবর্তী)
39. ট্যাব (বিকল্পগুলির মাধ্যমে অগ্রসর)
40. Shift + Tab (বিকল্পগুলির মাধ্যমে পশ্চাদবর্তী)
41. ALT + নিম্নরেখাঙ্কিত চিঠি (অনুরূপ কমান্ড চালনার বা সংশ্লিষ্ট বিকল্প নির্বাচন করুন)
42. ENTER (সক্রিয় বিকল্প বা বোতাম জন্য কমান্ড চালনার)
40. Shift + Tab (বিকল্পগুলির মাধ্যমে পশ্চাদবর্তী)
41. ALT + নিম্নরেখাঙ্কিত চিঠি (অনুরূপ কমান্ড চালনার বা সংশ্লিষ্ট বিকল্প নির্বাচন করুন)
42. ENTER (সক্রিয় বিকল্প বা বোতাম জন্য কমান্ড চালনার)
43. Spacebar (নির্বাচন করুন অথবা চেক বক্স পরিষ্কার যদি সক্রিয় বিকল্প একটি চেক বক্স)
44. তীরচিহ্নগুলির সাহায্যে (একটি বাটন নির্বাচন করুন যদি সক্রিয় বিকল্প বিকল্প বোতাম একটি গ্রুপ)
45. এফ 1 কী (ডিসপ্লে সাহায্য)
46. F4 কী (সক্রিয় তালিকা মধ্যে আইটেম প্রদর্শন)
44. তীরচিহ্নগুলির সাহায্যে (একটি বাটন নির্বাচন করুন যদি সক্রিয় বিকল্প বিকল্প বোতাম একটি গ্রুপ)
45. এফ 1 কী (ডিসপ্লে সাহায্য)
46. F4 কী (সক্রিয় তালিকা মধ্যে আইটেম প্রদর্শন)
47. BACKSPACE (কোন ফোল্ডারে এক স্তর আপ খুলুন যদি কোন ফোল্ডারে সেভ হিসেবে বা ওপেন ডায়ালগ বক্স-এ নির্বাচিত করা হয়)
মাইক্রোসফট প্রাকৃতিক কিবোর্ড শর্টকাট
মাইক্রোসফট প্রাকৃতিক কিবোর্ড শর্টকাট
48. উইন্ডোজ লোগো (ডিসপ্লে বা স্টার্ট মেনু লুকিয়ে)
49. উইন্ডোজ লোগো + + BREAK (সিস্টেম Properties ডায়ালগ প্রদর্শন)
50. উইন্ডোজ লোগো + d (ডেস্কটপ প্রদর্শন)
49. উইন্ডোজ লোগো + + BREAK (সিস্টেম Properties ডায়ালগ প্রদর্শন)
50. উইন্ডোজ লোগো + d (ডেস্কটপ প্রদর্শন)
51. উইন্ডোজ লোগো + এম (উইন্ডোজের সমস্ত মিনিমাইজ)
52. উইন্ডোজ লোগো + Shift + M (Restorethe থাকা উইন্ডোগুলো)
53. উইন্ডোজ লোগো + E ব্যবহার (Open My কম্পিউটার)
54. উইন্ডোজ লোগো + F প্রেস (একটি ফাইল অথবা ফোল্ডার জন্য অনুসন্ধান করুন)
52. উইন্ডোজ লোগো + Shift + M (Restorethe থাকা উইন্ডোগুলো)
53. উইন্ডোজ লোগো + E ব্যবহার (Open My কম্পিউটার)
54. উইন্ডোজ লোগো + F প্রেস (একটি ফাইল অথবা ফোল্ডার জন্য অনুসন্ধান করুন)
55. এবার CTRL + উইন্ডোজ লোগো + F প্রেস (কম্পিউটারের জন্য অনুসন্ধান)
56. উইন্ডোজ লোগো + F1 (উইন্ডোজ সাহায্য প্রদর্শন)
57. উইন্ডোজ লোগো + L (কীবোর্ড লক)
58. উইন্ডোজ লোগো + R (রান ডায়ালগ বক্স খুলুন)
56. উইন্ডোজ লোগো + F1 (উইন্ডোজ সাহায্য প্রদর্শন)
57. উইন্ডোজ লোগো + L (কীবোর্ড লক)
58. উইন্ডোজ লোগো + R (রান ডায়ালগ বক্স খুলুন)
59. উইন্ডোজ লোগো + U (ওপেন ইউটিলিটি ম্যানেজার)
60. এ্যাক্সেসিবিলিটি কিবোর্ড শর্টকাট
আট সেকেন্ডের জন্য 14 ডানে সরান (সুইচ FilterKeys পারেন বা বন্ধ)
60. এ্যাক্সেসিবিলিটি কিবোর্ড শর্টকাট
আট সেকেন্ডের জন্য 14 ডানে সরান (সুইচ FilterKeys পারেন বা বন্ধ)
61. বাম Alt + বাম Shift + Print Screen (উচ্চ বৈশাদৃশ্য সুইচ চালু বা বন্ধ হয়)
62. বাম Alt + বাম SHIFT + NUM টি লক (MouseKeys সুইচ অন বা বন্ধ)
63. SHIFT পাঁচবার (StickyKeys সুইচ অন বা বন্ধ)
64. NUM Lock (ToggleKeys সুইচ অন বা বন্ধ)
62. বাম Alt + বাম SHIFT + NUM টি লক (MouseKeys সুইচ অন বা বন্ধ)
63. SHIFT পাঁচবার (StickyKeys সুইচ অন বা বন্ধ)
64. NUM Lock (ToggleKeys সুইচ অন বা বন্ধ)
65. উইন্ডোজ লোগো + U (ওপেন ইউটিলিটি ম্যানেজার)
66. উইন্ডোজ এক্সপ্লোরার কিবোর্ড শর্টকাট
67. END টি (সক্রিয় উইন্ডোর নীচে প্রদর্শন)
68. হোম (সক্রিয় উইন্ডোর উপরে প্রদর্শন)
66. উইন্ডোজ এক্সপ্লোরার কিবোর্ড শর্টকাট
67. END টি (সক্রিয় উইন্ডোর নীচে প্রদর্শন)
68. হোম (সক্রিয় উইন্ডোর উপরে প্রদর্শন)
69. | NUM LOCK + + তারকা চিহ্ন (*) (সাবফোল্ডার নির্বাচিত ফোল্ডারের অধীনে সব প্রদর্শন)
70. | NUM LOCK + + প্লাস চিহ্নে (+) (নির্বাচিত ফোল্ডারের বিষয়বস্তু প্রদর্শন)
এমএমসি কনসোল উইন্ডো শর্টকাট কী
70. | NUM LOCK + + প্লাস চিহ্নে (+) (নির্বাচিত ফোল্ডারের বিষয়বস্তু প্রদর্শন)
এমএমসি কনসোল উইন্ডো শর্টকাট কী
71. Shift + F10 (নির্বাচিত আইটেমের জন্য অ্যাকশন শর্টকাট মেনু প্রদর্শন)
72. এফ 1 কী (সাহায্য বিষয়ে খুলুন, যদি থাকে, নির্বাচিত আইটেমের জন্য)
73. F5 চাপুন কী (সব কনসোল উইন্ডো বিষয়বস্তু আপডেট করুন)
74. এবার CTRL + F10 চাপুন (সক্রিয় কনসোল উইন্ডো ম্যাক্সিমাইজ)
72. এফ 1 কী (সাহায্য বিষয়ে খুলুন, যদি থাকে, নির্বাচিত আইটেমের জন্য)
73. F5 চাপুন কী (সব কনসোল উইন্ডো বিষয়বস্তু আপডেট করুন)
74. এবার CTRL + F10 চাপুন (সক্রিয় কনসোল উইন্ডো ম্যাক্সিমাইজ)
75. এবার CTRL + F5 চাপুন (সক্রিয় কনসোল উইন্ডো রিস্টোর)
76. ALT + ENTER (Properties ডায়ালগ, যদি থাকে, theselected আইটেমের জন্য প্রদর্শন)
77. F2 চেপে কী (নির্বাচিত আইটেমের রিনেম)
78. Ctrl + F4 (সক্রিয় কনসোল উইন্ডো বন্ধ করুন. কনসোল শুধুমাত্র এক কনসোল উইন্ডো আছে যখন, এই শর্টকাট কনসোল বন্ধ)
76. ALT + ENTER (Properties ডায়ালগ, যদি থাকে, theselected আইটেমের জন্য প্রদর্শন)
77. F2 চেপে কী (নির্বাচিত আইটেমের রিনেম)
78. Ctrl + F4 (সক্রিয় কনসোল উইন্ডো বন্ধ করুন. কনসোল শুধুমাত্র এক কনসোল উইন্ডো আছে যখন, এই শর্টকাট কনসোল বন্ধ)
রিমোট ডেস্কটপ কানেকশন ন্যাভিগেশন
79. CTRL + ALT + End (মাইক্রোসফট উইন্ডোজ এনটি সিকিউরিটি ডায়ালগ বক্স খুলুন)
80. Alt + Page Up (প্রোগ্রামের মধ্যে সুইচ বাম থেকে ডানে)
81. এবং ALT + Page Down (বাম ডান থেকে প্রোগ্রামের মধ্যে সুইচ)
82. ALT + ঢোকান (অধিকাংশ সম্প্রতি ব্যবহৃত অনুক্রমে প্রোগ্রামের মাধ্যমে সাইকেল)
80. Alt + Page Up (প্রোগ্রামের মধ্যে সুইচ বাম থেকে ডানে)
81. এবং ALT + Page Down (বাম ডান থেকে প্রোগ্রামের মধ্যে সুইচ)
82. ALT + ঢোকান (অধিকাংশ সম্প্রতি ব্যবহৃত অনুক্রমে প্রোগ্রামের মাধ্যমে সাইকেল)
83. এবং ALT + হোম (স্টার্ট মেনু প্রদর্শন)
84. এবার CTRL + ALT + BREAK (একটি উইন্ডো এবং একটি পূর্ণ পর্দা মধ্যে ক্লায়েন্ট কম্পিউটার সুইচ)
85. ALT + DELETE (উইন্ডোজ মেনু প্রদর্শন)
86. CTRL + ALT + ঋণচিহ্ন (-) (টার্মিনাল সার্ভার ক্লিপবোর্ডে ক্লায়েন্ট সক্রিয় উইন্ডোর একটি স্ন্যাপশট রাখুন এবং একটি স্থানীয় কম্পিউটার Print Screen টিপে হিসাবে একই কার্যকারিতা প্রদান.)
87. CTRL + ALT + প্লাস চিহ্নে (+) (টার্মিনাল সার্ভার উপর সম্পূর্ণ ক্লায়েন্ট উইন্ডোর এলাকায় স্থান asnapshot clipboardand একটি স্থানীয় কম্পিউটার এবং ALT + Print Screen aspressing একই কার্যকারিতা প্রদান.)
মাইক্রোসফট ইন্টারনেট এক্সপ্লোরার কিবোর্ড শর্টকাট
মাইক্রোসফট ইন্টারনেট এক্সপ্লোরার কিবোর্ড শর্টকাট
88. Ctrl + B (সংগঠিত ফেভারিটসগুলো ডায়ালগ বক্স খুলুন)
89. এবার CTRL + ই (সার্চ বার খোলা)
90. এবার CTRL + এফ (খুঁজুন ইউটিলিটি শুরু)
91. Ctrl + H (ইতিহাস বার খোলা)
89. এবার CTRL + ই (সার্চ বার খোলা)
90. এবার CTRL + এফ (খুঁজুন ইউটিলিটি শুরু)
91. Ctrl + H (ইতিহাস বার খোলা)
92. এবার CTRL + আমি (পছন্দসমূহ বার খোলা)
93. এবার CTRL + এল (ওপেন ডায়ালগ বক্স খুলুন)
94. Ctrl + N (একই ওয়েব ঠিকানা দিয়ে ব্রাউজার আরও একটি দৃষ্টান্ত শুরু)
93. এবার CTRL + এল (ওপেন ডায়ালগ বক্স খুলুন)
94. Ctrl + N (একই ওয়েব ঠিকানা দিয়ে ব্রাউজার আরও একটি দৃষ্টান্ত শুরু)
95. Ctrl + O (ওপেন ডায়ালগ বক্স, যেমন জন্য CTRL + L একই খুলুন)
96. এবার CTRL + পি (প্রিন্ট ডায়ালগ বক্স খুলুন)
97. Ctrl + R (বর্তমান ওয়েব আপডেট করুন)
96. এবার CTRL + পি (প্রিন্ট ডায়ালগ বক্স খুলুন)
97. Ctrl + R (বর্তমান ওয়েব আপডেট করুন)
Sunday, April 29, 2018
Oralce PL/SQL : Creating calendar table
SQL> create table calendar(c_date date);
Table created.
SQL> insert into calendar
2 select to_date(to_char(19900101), 'yyyymmdd') + lvl d
3 from ( select level -1 lvl
4 from dual
5 connect by level <= 20000);
20000 rows created.
Table created.
SQL> insert into calendar
2 select to_date(to_char(19900101), 'yyyymmdd') + lvl d
3 from ( select level -1 lvl
4 from dual
5 connect by level <= 20000);
20000 rows created.
Friday, April 20, 2018
Where are configuration files stored in Oracle 12c?
Where are configuration files stored?
Forms
| File | Path |
| formsweb.cfg | /config/fmwconfig/servers/WLS_FORMS/applications/formsapp_12.2.1/config |
| default.env | /config/fmwconfig/servers/WLS_FORMS/applications/formsapp_12.2.1/config |
| Templates | /config/fmwconfig/components/FORMS/instances/forms1/server |
| registry.dat | /config/fmwconfig/servers/WLS_FORMS/applications/formsapp_12.2.1/config/oracle/forms/registry |
| ftrace.cfg | /config/fmwconfig/components/FORMS/instances/forms1/server |
| webutil.cfg | /config/fmwconfig/components/FORMS/instances/forms1/server |
Reports:
| File | Path |
| rwserver.conf | /config/fmwconfig/servers/WLS_REPORTS/applications/reports_12.2.1/configuration |
| rwnetwork.conf | /config/fmwconfig/servers/WLS_REPORTS/applications/reports_12.2.1/configuration |
| rwservlet.properties | /config/fmwconfig/servers/WLS_REPORTS/applications/reports_12.2.1/configuration |
Monday, April 16, 2018
iconic button in oracle forms 10g
Set 10g forms icon easy way
1.
paste icon to C:\Oracle\DevSuiteHome_1\forms\java folder ---only gif ions
2.
C:\Oracle\DevSuiteHome_1\forms\server\formsweb.cfg
change imageBase=DocumentBase to imageBase=codebase
3.
go to forms set
button icon yes
button name null
button icon print.gif
4. restart oc4j
5. run your forms view icon
Saturday, April 14, 2018
same table column update rownum in oracle order by date column
Enter user-name: hr/hr@orcl
create table same_tbl_rownum(id varchar2(10),dt date, smv varchar2(10), sl number(10));
insert into same_tbl_rownum values('10','10-mar-18','bangla1','');
insert into same_tbl_rownum values('12','11-mar-18','bangla2','');
insert into same_tbl_rownum values('15','12-mar-18','bangla3','');
insert into same_tbl_rownum values('16','16-mar-18','bangla4','');
insert into same_tbl_rownum values('17','11-mar-19','bangla5','');
insert into same_tbl_rownum values('01','20-mar-20','bangla5','');
commit;
select * from same_tbl_rownum;
ID DT SMV SL
---------- --------- ---------- ----------
10 10-MAR-18 bangla1
12 11-MAR-18 bangla2
15 12-MAR-18 bangla3
16 16-MAR-18 bangla4
17 11-MAR-19 bangla5
01 20-MAR-20 bangla5
6 rows selected.
UPDATE same_tbl_rownum
SET sl= (select rn
from (
select rowid,
row_number() over (order by dt) AS RN
from same_tbl_rownum
) x
where x.rowid = same_tbl_rownum.rowid)
/
select * from same_tbl_rownum ;
ID DT SMV SL
---------- --------- ---------- ----------
10 10-MAR-18 bangla1 1
12 11-MAR-18 bangla2 2
15 12-MAR-18 bangla3 3
16 16-MAR-18 bangla4 4
17 11-MAR-19 bangla5 5
01 20-MAR-20 bangla5 6
6 rows selected.
Friday, March 30, 2018
Installing Oracle Forms and Reports 12c r2 on Windows 10 64 Bit.
Installing Oracle Forms and Reports 12c on Windows 10 64 Bit.

Hardware used for this installation is
· Intel i3-2370M CPU
· 8 GB RAM
· 64 Bit Operating system Windows 7 Home Basic Service Pack 1
Software required to be Installed on your machine.
- JDK-8u72-windows-x64.exe you can also use Jdk-8u71-windows-x64.exe 64 Bit.
- Oracle 12c pluggable database with AL32UTF8 Character set.
- Weblogic Server (Infrastructure)
To install Oracle 12c pluggable database visit my blog at
If you have not installed weblogic you can visit my blog to install JAVA 1.8 and Weblogic Server athttp://oraclestalk.blogspot.com/2016/02/installing-oracle-weblogic.html
Oracle Forms & Reports 12c Installation Steps.
Step 1. Download Oracle Forms and Reports 12c (12.2.1.0) Released on October 23, 2015 from below location.

Step 2. Unzip forms 12c setup file.

Step 3. Right Click the unzipped setup file and select Run as administrator. Select Yes when asked for User access control.

Step 4. Click Next on Welcome Screen.

Step 5. Skip Auto Update and click Next.

Step 6. Enter weblogic server (Middleware) home path where you have installed it. Click Next button.

Step 7. Select Forms and Reports Deployment and click Next button.

Step 8. Click Next button on prerequisite check.

Step 9. Click Install on Installation summary page.

Step 10. Installation progress is completed press Next.

Step 11. Installation completed press Finish button.

Your Installation process is completed. But there are few more steps are required. It is not like 11g forms installation where domain are automatically created during installation.
In 12c it is different. You have to create Repository and domain manually. Now let us see how to create this Repository and domain.
Repository & Domain Creation
Step 12. Let us start Repository Creation Utility (RCU). Your rcu.bat file is located at below location (Check location where you installed the forms and reports).
My location is C:\Oracle\Middleware\Oracle_Home\oracle_common\bin

Step 13. Right click this rcu.bat and select Run as administrator.

Step 14. Click Next on RCU Welcome page.

Step 15. On create repository page option for [Create Repository and System Load and Product Load] should be selected. Click Next.

Step 16. Enter pluggable database details and click next.


Step 17. Prerequisite check should be ok.

Step 18. In Select Components window enter prefix and click on option Oracle Platform Security Services all other components are automatically selected for Audit Services, Autid Services Append and Audit Services viewer Click Next.

Step 19. All Components prerequisites should be ok then press ok button.

Step 19. All Components prerequisites should be ok then press ok button.

Step 20. Select Use same passwords for all schemas and provide the password and click Next button.

Step 21. If you need to change the tablespace detail then click Manage Tablespaces and provide the details else Click Next.

Step 22. Click OK to continue.

Step 23. Tablespaces Created Click OK to continue.

Step 24. Start creating RCU by clicking Create button.

Step 25. RCU creation completed click Close.

Step 26. Create Domain
After completing RCU you will need to create the domain by executing the config.cmd from below location.
C:\Oracle\Middleware\Oracle_Home\oracle_common\common\bin\config.cmd
Right click and Run as administrator.

Step 27. Accept default and click Next.

Step 28. Select the required products and click the "Next" button.
· Oracle Reports Server - 12.2.1 [ReportsServerComponent]
· Oracle Reports Bridge - 12.2.1 [ReportsBridgeComponent]
· Oracle Reports Application - 12.2.1 [reports]
· Oracle Reports Tools - 12.2.1 [ReportsToolsComponent]
· Oracle HTTP Server (Collocated) - 12.2.1 [ohs]
· Oracle Forms - 12.2.1 [forms]
· Oracle Forms – 12.2.1 [forms]

Step 29. Click the "Next" button for Application location.

Step 30. Enter Admin user and password and click the "Next" button.

Step 31. Select Production and leave JDK as it it unless you are using other JDK and click the "Next" button.

Step 32. Enter details of Database configuration type which we have given during RCU Configuration.
Enter details of DBMS/Service as : pdborcl
Host Name : localhost
Port : 1521
Schema Owner : As It is
Schema Password : Provide we have given during RCU Configuration.
Host Name : localhost
Port : 1521
Schema Owner : As It is
Schema Password : Provide we have given during RCU Configuration.
Click Get RCU Configuration button. If connection is successful then press Next button

Step 33. RCU Configuration success. Click Next Button.

Step 34. Click Next. It is assumed that all component have same schema passwords.

Step 35. Click Next. When all JDBC Test is successful.

Step 36. Select Managed Servers, Clusters and Coherence and click Next.

Step 37. Check that the Server Groups is set to FORMS-MAN-SVR (for Forms). And REPORTS-SVR (for Reports). Click Next.

Step 38. Accept the Cluster details and Click Next.

Step 39. Accept the details and Click Next.

Step 40. Accept the details for Coherence Cluster and Click Next.

Step 41. Accept the details for Machines Click Next.

Step 42. Move AdminServer to Machines by clicking > Arrow.


Step 43. Click Add Button and add ohs1 system component and component type as OHS and click Next.

Step 44. Enter Listen Address as localhost and click Next.

Step 45. Select ohs1 and click > Button to move ohs1 to Machines.


Step 46. Click Create on configuration summary.

Step 47. Configuration progress starts.

Step 48. Configuration Completes press Next button.

Step 49. Click Finish button.

Oracle Forms 12c, Reports 12c are installed. Now we need to configure Reports and Forms in following steps.
1. Open Command prompt and create boot.properties file by giving following command.
C:\> MKDIR C:\Oracle\Middleware\Oracle_Home\user_projects\domains\base_domain\servers\AdminServer\ security
C:\>echo username=[Your weblogicUser]>
C:\Oracle\Middleware\Oracle_Home\user_projects\domains\base_domain\servers\AdminServer\security\boot.properties
C:\>echo password=[Your weblogicPassword]>>C:\Oracle\Middleware\Oracle_Home\user_projects\domains\base_domain\servers\AdminServer\security\boot.properties
2. C:\> MKDIR C:\Oracle\Middleware\Oracle_Home\user_projects\domains\base_domain\servers\WLS_FORMS\security
C:\>echo username=[Your weblogicUser]>
C:\Oracle\Middleware\Oracle_Home\user_projects\domains\base_domain\servers\WLS_FORMS\security\boot.properties
C:\>echo password=[Your weblogicPassword]>>C:\Oracle\Middleware\Oracle_Home\user_projects\domains\base_domain\servers\WLS_FORMS\security\boot.properties
3. C:\> MKDIR C:\Oracle\Middleware\Oracle_Home\user_projects\domains\base_domain\servers\WLS_REPORTS\security
C:\>echo username=[Your weblogicUser]>
C:\Oracle\Middleware\Oracle_Home\user_projects\domains\base_domain\servers\WLS_REPORTS\security\boot.properties
C:\>echo password=[Your weblogicPassword]>>C:\Oracle\Middleware\Oracle_Home\user_projects\domains\base_domain\servers\WLS_REPORTS\security\boot.properties
Step 1. Start Node Node Manager by providing following command located in
C:\Oracle\Middleware\Oracle_Home\user_projects\domains\base_domain\bin
Right click startNodeManager.cmd and select Run as administrator.
C:\Oracle\Middleware\Oracle_Home\user_projects\domains\base_domain\bin
Right click startNodeManager.cmd and select Run as administrator.
Node manager is started and configuration settings are displayed. Do not close this window.
Step 2. Now we will start Weblogic Admin Server by providing following command located in C:\Oracle\Middleware\Oracle_Home\user_projects\domains\base_domain\bin
Right click startWeblogic.cmd and select Run as administrator.
Right click startWeblogic.cmd and select Run as administrator.
Provide Weblogic User and password which we have given during installation and press Enter Key.
Now Weblogic server is started and in Running mode.
Open the Command window and we will start WLS_FORMS by giving following command.
C:\Oracle\Middleware\Oracle_Home\user_projects\domains\base_domain\bin\startManagedWebLogic.cmd WLS_FORMS
Now we can start the forms builder from below location.
C:\Oracle\Middleware\Oracle_Home\bin\frmbld.exe.

Step 3. Now we will start the HTTP Server. Open the browser I used Internet explorer and give URL ashttp://localhost:7001/em. It will open the console. Provide the Domain Admin User name and password.

Step 4. Now Click Target Navigation Icon on left top most Icon
Step 5. Expand HTTP Server and click ohs1 and click Start Up at the top. Ohs1 completed successfully now Press Close button.


Http ohs1 is running.

Step 6. Edit the C:\Oracle\Middleware\Oracle_Home\forms\templates\config\forms.conf"
file to contain the following.
SetHandler weblogic-handler
WebLogicHost localhost
WeblogicPort 9001
WebLogicHost localhost
WeblogicPort 9001
Now Edit the C:\Oracle\Middleware\Oracle_Home\reports\conf\reports_ohs.conf file to contain he following.
SetHandler weblogic-handler
WebLogicHost localhost
WebLogicPort 9002
WebLogicHost localhost
WebLogicPort 9002
Now copy both [forms.conf and reports_ohs.conf ] to following location.
C:\Oracle\Middleware\Oracle_Home\user_projects\domains\base_domain\config\fmwconfig\components\OHS\instances\ohs1\moduleconf\
Now Restart the HTTP Server to take effect.
Step 7. Now Start the forms server by providing following command in Command window
C:\Oracle\Middleware\Oracle_Home\user_projects\domains\base_domain\bin\startManagedWebLogic.cmd WLS_FORMS
Now Restart the HTTP Server to take effect. You can see that forms server is started and running and its health is ok.
At this point we have not created the Report server and Report server is not started this we will start afterwards.

Now we will check that our forms is installed successfully of not. We need Java JRE to be installed which we have already installed before installing Weblogic Server.
Now Open Internet Explorer and check that our forms is successfully installed and running provide the following URL.
(in hostname provide your hostname where you have installed for ex. localhost).
See our forms is installed and running successfully.


Step 8. Now we will use WLST (Weblogic Scripting Tool) to create Report Components.
· We will create a Reports tool for Machine ‘AdminServerMachine’ – [reportsToolsName].
· We will Create a Reports server for machine 'AdminServerMachine' -
Execute WLST.cmd from following location.C:\Oracle\Middleware\Oracle_Home\oracle_common\common\bin\WLST.cmd
Type the following commands in WLST Window.
connect("weblogic",<"WeblogicPassword">, "localhost:7001")Now Type the following command to create report tools
createReportsToolsInstance(instanceName=’RepTools1’, machine=’AdminServerMachine’)createReportsServerInstance(instanceName=’MyServer1’, machine=’AdminServerMachine’)exit()
Now your Reports Tool and Server is created.Step 9. Now let us start WLS_REPORTS. Open command prompt and give following command.
C:\Oracle\Middleware\Oracle_Home\user_projects\domains\base_domain\bin\startManagedWebLogic.cmd WLS_REPORTS
Now start the Report Builder from the below path.
C:\Oracle\Middleware\Oracle_Home\user_projects\domains\base_domain\reports\bin\rwbuilder.bat

I have created simple report using HR.Country table.
Now we have installed Forms and Reports 12c Hope you will enjoy installing.

Subscribe to:
Posts (Atom)
-
# Report Column (only column): 1. Column Formatting > HTML Expression <span style="display:block; width: 200px"> #...
-
 Installing Oracle Forms and Reports 12c on Windows 10 64 Bit. Hardware used for this installation is · Intel i3-2370M CPU · ...
 -
when open forms builder then errors FRM-91129: fatal error: no value specified for required environment variable FORMS_BUILDER_CLASSPATH a...
-
---------------------------- | Keyboard Shortcut | ---------------------------- · Create: Breadcrumb Region Ctrl+/, C, B · ...